Tag Archives: tip

Microsoft Causes Inflation

This simple trick will cut your Word document down to size.

The Problem

Word LogoWord documents can suffer from bloat. An author tried to submit a 32-page Word file to us. The formatting was straightforward, but the file was a whopping 2.4 MB. Our on-line systems rejected the file (because why would we want a file that big?) The author saved it as a Rich Text Format (RTF) file of 600 kB and uploaded it. We imported it into Word and saved it as a .docx and low and behold, it was back to nearly 3 MB. Over 2 MB bigger without the addition of so much as a single comma. We reviewed the file and added some simple mark-up, and it blew up to well over 3MB.
After that, I applied this trick to the script and got it down to less than 90 kB – two orders of magnitude smaller. (And with five minutes work, it went to 80 kB.) So what’s going on?

The Cause

The frank answer is that I’m not sure. I know some of the causes, but Word is a complex tool, so attributing anything to a single cause is dubious, and I’m trying to approach this as a user, not as a product tester. Broadly, there are two issues. Firstly, Word tracks changes. Even if you declare an edition to be final, and stop tracking changes, Word seems not to discard the change data. It’s still hanging around somewhere, even though it’s not used. Secondly, if your document is edited by multiple users (or one user on several computers), it picks up template information from each instance without discarding the previous information, so it keeps adding unused data to the document. (There may also be an issue with using different versions of Word to edit one document, and certainly further issues with editing documents in a mix of Word and other word-processors.)

The Solution

The solution is to leave all the rubbish behind:-
Create a new blank document (preferably using a clean template that includes just the Styles you need). Now open your bloated document. Select all the contents (either by mouse or use a shortcut; Ctrl-A on a Windows computer). Click copy (Ctrl-C). Switch to your new blank document and Paste (Ctrl-V). Then Save. The new version will have left most of the dross behind and kept your text, your formatting and not a lot else.

(There is a minor additional tweak: that process will copy over all the Styles from the source document, including ones that are not actually in use. You can reduce the file size a little more by deleting unused Styles.)

Postscript – What If That Wasn’t My Problem

The other major cause of Word Bloat is embedded images. If you need pictures, you need them, but consider cropping and shrinking to a size appropriate for your purpose before you embed images in your document.
Anacrusis As Afterthought

Another Tip for Sibelius Users

So you’ve written a song.  Having done that, you realise that the singers are unlikely to have perfect pitch or perfect rhythm, so it’s desirable to set the pitch and tempo for them by means of a lead-in.  To deal with that you insert a few bars at the start of the song.  Then you realise that the melody for the lead-in starts mid-way through a bar; you’ve got an anacrusis.
A what?
An anacrusis: a pick-up bar that contains less than a whole bar of music.
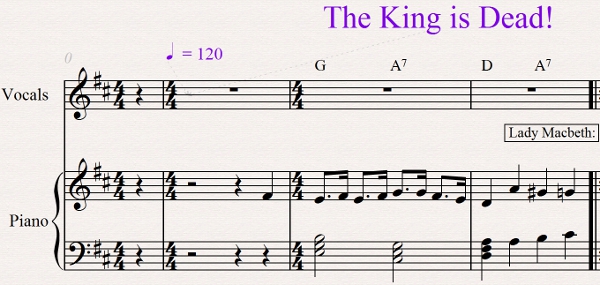
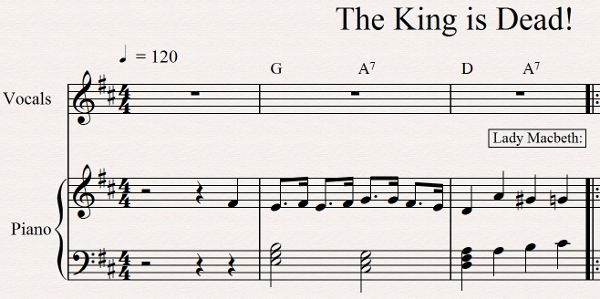
That’s fine, it’s perfectly musical, but it looks like this.Sibelius Tip - dealing with space before an anacrusis

That isn’t wrong, it’s just that it doesn’t look neat having that first bar mainly filled with rests.  The usual way of dealing with that is to have a pick-up bar containing fewer beats than the time signature.
But how do we do that in Sibelius, from the starting point above?

Select the first bar.
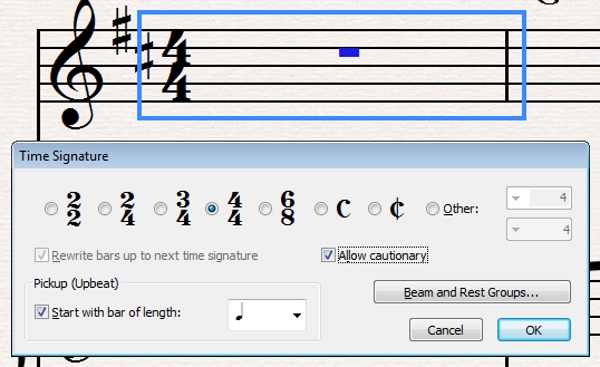
From the menu [Create] [Time Signature]
Select your time signature, then check the “Start with bar of length” box and select the length of your anacrusis.  Note that you can put a dot after the note symbol to create – say – a lead-in of three quavers (eighth notes).Sibelius - inserting a time signature

Now you want to delete the unwanted old first bar.  However, first you need to move anything that’s in or attached to that bar.  That usually means whichever you are using out of the title, subtitle, copyright line, composer, lyricist and tempo.

Select each of those elements, then [Edit] [Cut],
Select the new first bar then [Edit] [Paste].Sibelius - moving objects attached to the first bar

Similarly, move all the notes from the old first bar into the new first bar.

Having created the new first bar, with contents and links to titles, etc., it’s safe to remove the old one.

Select the old first bar (on all lines of the system) and
[Edit] [Delete Bars]

This leaves you with an unnecessary time signature at the start of the second bar.

Select the unwanted time signature.  Delete.  (The Delete key on your keyboard will have the desired effect!)  A cautionary message – “Do you want to rewrite the following bars up to the next time signature (or the end of the score)?” – pops up.  Whilst this may look alarming, in this case, because you are not changing the time signature, it will have no effect.  (Clicking “No” may well be marginally quicker!)

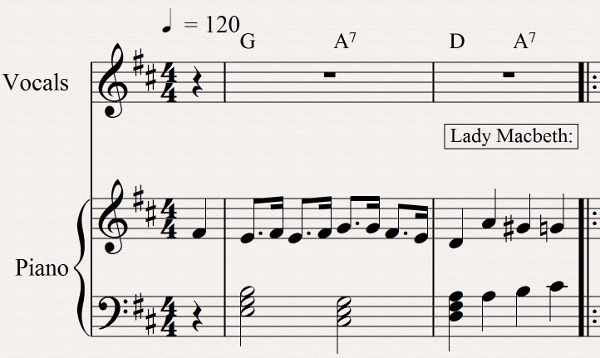
The result should look like this:Sibelius - an anacrusis with no leading spaces

Lyrical Panorama

This post is a tip about using the Sibelius score-writing package – a minority interest!

When writing lyrics into a Sibelius score, there are a whole variety of ways to get them misaligned.  If you write them one bar at a time, for example, Sibelius will off-set from the lowest note in the bar, so the lyrics in different bars will be off-set to different levels.  However you do it, you get a ragged effect, like this:- Misaligned lyrics
Correcting this line-by-line can be messy (and can lead to further corrections if you change the positions of line breaks after you’ve aligned the lyrics.)

These days, I tend to start with the Panorama view for correcting this.  Panorama displays the whole score as one continuous system.  The following guideline uses the menu commands to achieve all the goal; there are short-cuts for many of these commands – but since you can find them from the menus, the menus fit my  purpose here.

Let’s start by looking at the panorama: [View] [Panorama]
Now select the entire score: [Edit] [Select] [Select All]
Since we want to align just the lyrics, we filter the lyrics: [Edit] [Filter] [Lyrics]

Note of caution: you’ve just selected all the lyrics in the entire score.  If you have multiple verses below a single musical line, then aligning those will put them all on top of one another.  Not a good idea.  Instead, you need to use the Advanced Filter – [Edit] [Filter] [Advanced Filter] and use the text filter to select just the lyrics for line 1 (etc.)  Get to know the advanced filter; it’s worth your time.

Having selected the appropriate set of lyrics, [Layout] [Align in a row]

That gets all your lyrics aligned with each other.  You can then scroll across the panorama to check the spacing from the lowest note, and use the arrow keys to move all the lyrics up or down accordingly.

The result should look like this:-

Realigned Lyrics
You can, of course, use the same process to align and move other components.  Here I used

[View] [Panorama]
[Edit] [Select] [Select All]
[Edit] [Filter] [Chord Symbols]

to select and move the chord symbols closer to the stave:-
Chord symbols aligned and moved